Increase your internet speed

Make Internet Faster:Increase Internet Speed:


I think your internet connection is not faster to increase internet speed you might searched through internet.
NOW THIS IS THE BEST WAY TO DO….

Increasing Internet Speed

follow the instructions on the pictures (left click on that and click “open network and sharing center”)

then …
then…
then
then (click there and and click properties)
and then click and and apply the setting. BOom!you got the internet faster and lot speeder.

!!!!!!!****YOU INCREASED INTERNET SPEED****!!!

Thanks If this Works Shootup in comments.
share this with friends and family
Copyright Ⓒ 2015. All Rights Reserved.

How to make your android phone Work faster, Long Lasting Battery,More Stability

Note: only for rooted phones
have you ever wondered how to speed up phone,powerful battery, And more Stability
Apk link: Click To Download Apk File

Root booster is for those who need more performance to run applications smoothly without lags or for those who need to improve a poor battery life

There are many apps that save battery or increase performance, however Root Booster uses the most proven settings to achive the best results. You can easily apply these settings with preset modes which ensure speed boost, battery boost or stability boost. These modes are achieved by applying appropriate settings to the main phone components. Here are some explanations for what particullary Root Booster does to your CPU, RAM and Android OS system.
Hibernation (Android OS optimizer)
Each Android application can have one or multiple services. They run in the background and usually perform some kind of task. Many people think that when they kill an application, it completely stops draining your battery and computing power, but that’s not true. Application still have servicies that are running after killing and still drains battery and comuting power. On the other hand, if you hibernate an application it stop it\’s servicies and application does not drain battery and CPU computing power anymore. Hibernation is gently and efficient way to save your battery and increase performance.
Root Booster will find battery draining and performance demanding applications and auto hibernates them.
CPU (processor governor control) 
A governor is a driver for the regulation of CPU frequency. Governor decides how fast and when will be achieved maximal or minimal CPU frequency. Setting apropriate governor makes your device more battery saving, fast or even more stable. However, deciding which governor is suitable is a little bit tricky.
Root Booster can decide which governor you should use and automatically applies the most suitable governor for the selected mode.
RAM (memory manager)
Each application uses VM heap for it ‘s data and work. The main reason to change the VM heap size is stability improvement. Many big applications need a big amount of memory (VM heap) for their work. If the VM heap size is smaller than the requested memory, it causes an application crash (Out of memory error). Setting heap size is hard task and there is no manual to set up for better performance. Better performance can be only achieved by testing.
Root boster will test your RAM and sets up your VM heap size for better stability and performance.
Note: Root Booster is designed to work only with rooted devices
Disclaimer: Root Booster is proved by thousands of users and have the auto backup system, but we do not have responsibility for damaging your device.

Earn money with QUICK CASH use my code and earn 50 credits on startup (QJQXPS) legit

USE CODE : “QJQXPS”

You spend hundreds of hours using your mobile, but what if there was an easy way to get paid for it? App companies are spending BILLIONS of dollars every year to get people use their apps but you see NONE of this money. QuickCash empowers YOU to change that reality and claim that money back to your pocket. It offers a wide variety of simple and fast ways to leverage your social contacts (e.x. on Facebook or Whatsapp) to earn money and exchange it for PayPal cash or use it to recharge your mobile.

QuickCash is a revolutionary way to make money with your mobile, fast and easy!

★ What Is QuickCash? ★
QuickCash is the most simple and fastest way to make money on your social networks. We pay cash every time you or your friend install an app. The more friends get to download the apps you recommend the more cash you earn. We’ll also give you lots of fun and quick ways to post on your social networks and make money with just a few taps.

★ How Much Can I Earn? ★
You will make your first $5 in less than 5 minutes. A couple of minutes each day will make you over a hundred dollars cash each month.

★ What To Do When I Didn’t Receive My Coins? ★
Due to proliferation of different partners we cooperate with, it happens that you can miss some Coins once in a while. In case it happens, please check what third-party offer wall the offer came from and contact them accordingly:
Supersonic Offer
Open up the supersonic offer wall again and click “Missing Coins” at bottom of the screen.
Aarki
Please fill out the following information and contact customer-service@aarki.net with the following info:
1) Name: 
2) Offer Name:
3) Date when the offer was completed:

How to protect your privacy on Facebook

Facebook encourages you to share your life. But you don’t want an employer to see your crazy drunken selfie, and there are probably things you don’t want all your friends to see either. Facebook offers a slew of privacy features to help keep you and your data safe from prying eyes, but it’s up to you to take advantage of them. Here’s how to control what friends, strangers, apps, and advertisers can see and share.

Restrict your personal info

Your Timeline is your profile page on Facebook. It contains your name, birthday, contact info, Friends list, check-ins, likes, birthplace, and photos. Not only is this info used and shared to serve you ads, but it can also give bad agents a wealth of information they can use against you. For example, if you list your birthday or birthplace, that information could be helpful to identity thieves. Or if you include your birthday in an authentication method, such as your password or a security question, others can get the info from Facebook and use it to access your accounts.
screen-shot-2015-07-29-at-2-30-12-pm.png
Therefore you should keep as few personal details on Facebook as possible. If you don’t provide your real birthday, you may miss out on a flood of birthday wishes, but your real friends will remember.

Control what strangers see

Restricting personal details is a good start, but you probably don’t want strangers perusing your photos and status updates, either. We recommend restricting your profile access to friends only. Do so by going to Settings and Privacy (in the More menu in the mobile app) or click the padlock icon at top right (in the desktop version of Facebook) and go to “Who can see my stuff?”
After you change settings, test how your Facebook page appears to everyone who’s not on your friends list. Open your Timeline, click the three dots next to View Activity Log (on the desktop) or the More button (on mobile), then select View As to see how your profile appears to the public. You can also toggle to View As Specific Person — click that link, then type in a name and hit enter. If you see info in your About section that you don’t want to be so visible, click your profile, then About, and Manage Sections, and uncheck all the sections you don’t want to appear, such as Videos and Likes.

Control what friends see and do on your page

You can also control who sees what at the individual post level. Use the post window’s upper right button (in the mobile app) or the button next to Post (on the desktop) to choose Public, Friends, Close Friends, Only Me, and so on. This also determines who can like or comment on your posts. Be aware that even if you set Friends as the limit, if you tag someone, that person and all of their friends will be able to see the post.
To add friends to your Close Friends list, head to your homepage and scroll down the left hand rail to Close Friends (on your desktop) or click More and scroll down to Close Friends (on mobile). Click Add Close Friends (on mobile) or Add Close Friends to List (right rail on desktop) to add them one by one.
Another option is to create a custom Group. This is helpful if you want a shortcut for sharing with select people — for example, if you want to share baby photos only with family members, or if you want to share posts about politics only with like-minded friends. To set up a group, go to Main Menu, then Create Group (on desktop) or More and then Create Group (on mobile) to start setup.
If you accidentally share something publicly, click the post’s upper right button, then Edit Privacy (on mobile) or the People button under your name (on desktop) to limit your audience. To edit or delete a post, head to your Timeline, click the post’s upper right button, and choose Edit Post or Delete.
screen-shot-2015-07-29-at-2-12-15-pm.png
Do you want all friends to be able to post to your Facebook page? If not, open Settings on your desktop and select Timeline and tagging. There you can adjust who can add status updates or photos to your Timeline, as well as how you’d like Facebook to manage your tags. We suggest choosing to review all tagged posts and photos of you before peers see them on your Timeline. To untag yourself from a photo on mobile, go to it, click the More button, and choose Remove Tag. On your desktop, go to Options underneath your photo and select Remove Tag. You can never be retagged in this photo.
Keep in mind that you don’t control who sees your likes and comments on anyone else’s Timeline. Whoever sees your friend’s Timeline can see your posts there. However, you can tap your comment (on mobile) or scroll over your comment (on desktop) to edit or delete it.

Choose your friends wisely

screen-shot-2015-07-29-at-2-10-19-pm.png

We recommend accepting friend requests only from people you actually know. You can control who is able to friend you under Settings, Privacy, and “Who can contact me?”.
When a user who’s not your friend searches for you on Facebook, they’ll see your name, username, gender, profile picture, cover photo, and user ID, as well as your Facebook networks. If you view your profile as Friends of Friends or Public and see posts that you forgot to make Friends only, click each post’s audience button and adjust the privacy setting. If you don’t want others to be able to search for your account on Facebook or via Google, set search limits under Settings, Privacy, and “Who can look me up?” (on desktop).
It’s also important to consider who has access to your Friends list, because friend snatchers may send them friend requests. To limit access, open Facebook on your desktop, go to your Timeline, click the Friends section on the left-hand side, then Edit Privacy. There you can limit access to Friends, Friends Except Acquaintances, or Only Me (we recommend the last).
screen-shot-2015-07-29-at-2-02-06-pm.png

Block and unfriend

screen-shot-2015-07-29-at-2-02-40-pm.png
If you wish to remove or limit contact with a Facebook friend, you can block or unfriend. Unfriended individuals will no longer be able to see anything you share only to friends, but they can see posts that are public or (if you have mutual friends) things in friends of friends’ posts. Blocked individuals can no longer add you as a friend, see what you post (unless it’s public), tag you, invite you to events or groups, or communicate with you.
Tap on your Friends tab (mobile) or go to your Friends page and click the Friends button (desktop), then select Unfriend to cease connection. To block someone entirely, go to their profile, click the More button (mobile) or the three dots (desktop) at the top right and choose Block.

Use Privacy Checkup

Facebook frequently updates its features, so it’s a good idea to check your privacy regularly. Go to View As on your Timeline to see what the public can see on your page. On the desktop, you can also click the padlock icon at top right, then Privacy Checkup to check and modify your privacy settings.

Disable location tracking

Facebook constantly collects your information: from every post, message, and purchase; every interaction with third-party apps that rely on Facebook Services; every address book you sync or import from your device on the social media site.
The company also collects location info for every photo you post from your device. Turn off Location Services on your mobile device to prohibit this. Facebook may collect your device info (operating system, hardware version, browser type, and so on) and associate it to provide a fluid experience across devices. Learn more about Location Services.

Opt out of targeted ads

When you see an ad that you’d rather not, click the top right button above it, then click “Why am I seeing this?”. You will get a response describing why, such as you’ve visited the product website before. To opt out of targeted ads, click Manage Your Ad Preferences (mobile) or go to Settings and select Ads in the left rail (desktop). There you can add or remove preferences. To opt out of seeing ads on your device based on your use of websites and apps off Facebook, head to Device settings, then Privacy, then the Advertising section, and turn the Limit Ad Tracking option on. Facebook often serves you ads based on the pages you like and ads you’ve clicked on. Click the Ad menu to hide all ads from a particular advertiser as well. This helps Facebook show you more relevant ads.
screen-shot-2015-07-29-at-2-18-18-pm.png

Limit other apps connected to Facebook

You may not realize, but whenever you connect another app to Facebook or use Facebook to log in to another app or site, your name, profile picture, cover photo, gender, networks, username, and user ID become available to that third-party app. Also, everyone on Facebook can see that you use this app.
We recommend that you go to Facebook’s main menu, then Settings, then Apps (on desktop) or to More, then Account Settings, then Apps (on mobile) to see which apps are connected. You can hover over them and click Edit Settings to change the visibility and/or reduce the info that you provide to the app. You can also just click the X to remove the connection altogether. Underneath you can tweak the amount of third-party app usage info that you share with Facebook and change game settings to play anonymously.

Manage your activity

The Activity Log shows all your actions on Facebook — likes, comments, and so on. Only you can see your Activity Log, but it’s a handy place for managing activities, such as editing or hiding items on your Timeline, unliking, and changing who can see the post. Reach it from the main menu on your desktop or the top nav on your mobile device. You can also download your account information through the Download Your Information tool.
screen-shot-2015-07-29-at-2-20-06-pm.png

Deactivate your account

Of course, one way to avoid oversharing on Facebook is to deactivate your account. This disables your profile and removes your name and photos from your posts. You may still appear in a friend’s Friends list or in old messages.
For the desktop version, go to the Settings menu, click Security, and choose Deactivate. In the Facebook mobile app, select More, then Account Settings, then Security, and then scroll down to Account. Follow the prompts and you’re done. You may reactivate anytime or delete your account altogether here.
When you delete your account, Facebook deletes your posts. But be aware that information that others have shared about you won’t be deleted.

Plan for your social afterlife

screen-shot-2015-07-29-at-2-12-15-pm.png
Do you want your Facebook account to live on after you’ve died? You can set up a friend or loved one as your Legacy Contact to manage the page. On your desktop, go to Settings and Security, then click Legacy Contact and add your preferred person for the job. On your mobile device, you’ll find this section under More, then Account Settings and Security. Your designated page tender will be able to do anything except post as you or view your messages. Alternatively, if you want your account to die with you, then choose Account Deletion.
Note: The original post is from cnet
Link to this ORIGINAL ARTICLE – 

http://download.cnet.com/blog/download-blog/how-to-protect-your-privacy-on-facebook?tag=rb_content;main

Girl with Terminal Cancer Gets Birthday Party, Prom, Wedding Rolled Into One Blowout Event

PHOTO: Girl with incurable cancer has blowout birthday party for 5th birthday.

AUTO START: ON OFF
An Oregon girl who has battled cancer for years was able to celebrate her fifth birthday in the style of a princess with a blowout event designed to be a prom, wedding and birthday all rolled into one.
Lila May Schow’s parents decided to throw the large event after doctors found they were out of options to treat the girl’s cancer, according to her father, Ryan Schow.
Lila was diagnosed at age 2 with stage 4 neuroblastoma, a cancer where malignant cells form in certain types of nerve tissue. Her father told ABC News that the girl has gone through grueling treatments for the last few years.
“She’s been fighting ever since,” Lila’s father said. “It’s been 3 years, well over nine surgeries…numerous chemo-therapies.”
PHOTO: Girl with incurable cancer has blowout birthday party for 5th birthday.

Courtesy of Ryan Schow
PHOTO: Girl with incurable cancer has blowout birthday party for 5th birthday.
He said he and Lila’s mother decided to have the big party to celebrate Lila’s life on July 31.
“We’re not going to get the prom dance or daddy-daughter dance,” said Schow.
After Lila’s mother put up a Facebook post about the party they had hundreds of replies. They planned for the party to be Cinderella-themed, since Lila loves princesses.
“We had an incredible outpouring in the community and pretty much in all over the state,” said Schow. For the princess-themed party they had special bakers who also appear on the Food Channel and even a donated horse and carriage to bring Lila into her party.
PHOTO: Girl with incurable cancer has blowout birthday party for 5th birthday.

Courtesy of Ryan Schow
PHOTO: Girl with incurable cancer has blowout birthday party for 5th birthday.
On the day of the big party hundreds of people showed up in honor of Lila.
“You hear so much about terrible things happening,” said Schow. “This is one of those instances that people all come together for the right the reasons.”
Schow said that Lila loved her party, but that he was surprised when he asked about her favorite part.
“She said she really liked all the princesses and she said ‘When my daddy cried b/c he was so happy,” said Schow. “We did a father/daughter dance and I couldn’t contain myself.”

original post :
http://abcnews.go.com/Health/girl-terminal-cancer-birthday-party-prom-wedding-rolled/story?id=32881084


How to Customize the Window 10 Start Menu

Horray! what we are expecting is came before our eyes…! the Windows 10 finally brought back the start menu. While it is a really honest start menu with a lot of features in it, The microsoft’s tricky start which they added in win 8 Versions,which opens and covers the whole screen, noticeably, it has some similar differences, the new start screen comes with windows 8 tiles to the right of the standard program and power settings. You can customize it with a lot more in feature, so Go Ahead.

CHANGING THE START MENU COLOR. 

To change the background color of your Start menu you need to change the theme of Windows 10.
  • Right mouse click on the desktop and click ‘Personalize’ 
  • Click ‘Color’ near the bottom center of the open window
  • Select a color
  • Hit Save
That’s it, once you done Saving, your start menu color was vanished with a likely color of your own. The default, at this time, is that the Start menu color will sync with your background. If you want to go back to the automatic selection, open the window where you select the color and in the top left, the color pallet icon will turn automatic selection back on.

10 WordPress Tricks That You Probably Do Not Know

Are you sure to know all the tips and tricks about WordPress?

This CMS has so many features; surely you know how to create posts, pages, and upload media content.
But there are a few less commonly used features that can really help you streamline your work.
Let’s get started!
Here are 10 WordPress tricks you probably do not know.
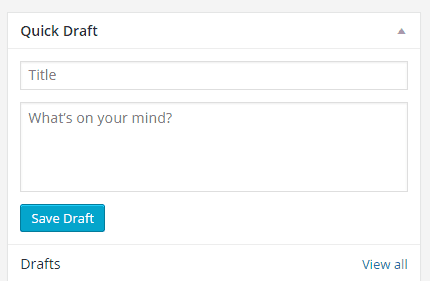
1. Quick Draft

If you run a blog, you surely know that there is nothing worse than not having anything to write, while fixing the blank page in search of inspiration.
In my experience, the best way to avoid this problem is to take note of all the ideas that come to mind.
WordPress has a tool to create a “Quick Draft”:
Quick draft on WordPress - screenshot of  NoPassiveIncome blog WP dashboard
It’s on your blog dashboard.
Here you can insert titles, a brief summary of your idea and save the draft.
When you back out of ideas, you’ll find some saved projects under your posts.

2. Screen Options

Sometimes, when you create a post or a page, there are options that you just do not manage to find.
The trick is to click “Screen Options” in the upper right corner (click the image to enlarge).
Screen options on NoPassiveIncome WP dashboard
Here there are many voices to tick, one for each option.

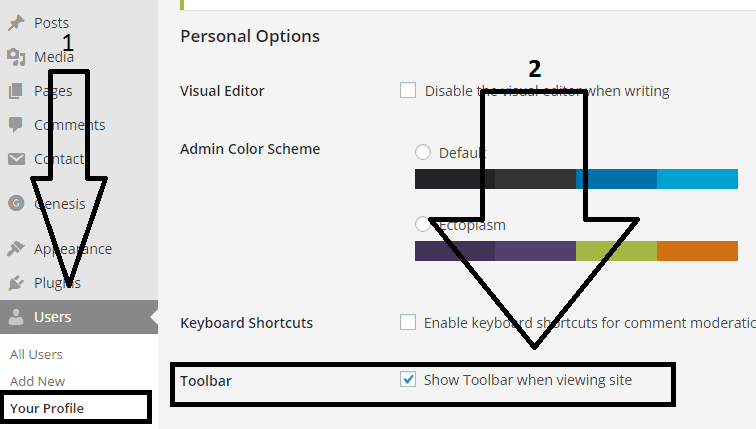
3. Turn Off the Toolbar When Viewing the Site as Admin

When you are logged in your WordPress blog and then you are surfing the live site, the toolbar is always visible at the top.
Sometimes, you want to disable it (for example if you need to take full screenshots of your blog or details of the upper part of your site).
To disable it, simply navigate in Users—>Your Profile within your WordPress dashboard and uncheck the toolbar option, as indicated in the following image:
how to disabling to show toolbar when viewing WordPress site as admin

4. Mobile Application

Did you know that WordPress also has an application for smartphones and tablets?
The app is available for both Apple and Android and can be used to manage both sites on WordPress.com or built with WordPress.org.
You will manage posts, pages and comments, and also some site settings.
Click here to get the official WordPress mobile app.

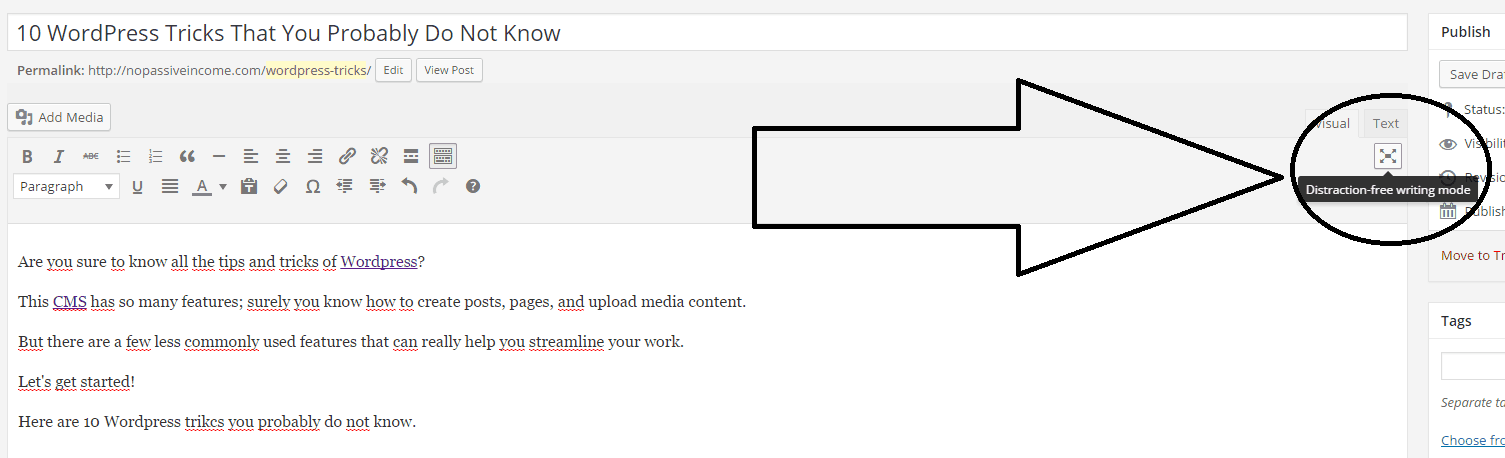
5. Distraction-Free Writing Mode

Some people prefer to write their post on a text program such as Word, and only when the draft is ready, transfer it to WordPress.
While others (like myself) prefer to write directly into WordPress.
In any case, there’s an interesting feature, relatively new.
how to enable distraction-free writing mode in wordpress - screenshot at NoPassiveIncome blog dashboard
This is the distraction-free writing mode.
To activate it, simply click the symbol as indicated in the image above.

6. Live Preview of Themes

From time to time, it is normal to be groped by one of the many WordPress themes available.
However not always the end result is like the demo.
With WordPress, you can test out the themes without actually activating them, using an awesome WordPress option!
To do this, install the theme that interests you, without activating it.
Then click “Live Preview”, as indicated in the image below. You’ll work on the customization options and see the live preview of your changes.
live preview of theme installed on wordpress blogs - screenshot at NoPassiveIncome blog

7. How to “Export” Your WordPress Data

It’s always a good idea to back up your site: there might be any kind of problems with updates, or a hacker attack, or even a mistake on your part.
The absolute fastest way to make a copy of your content (be careful not the entire site, only the WordPressdata: posts, pages, custom post types, comments, custom fields, categories, tags, custom taxonomies, and users) is through the “Export” option, included in your WordPress dashboard, under “Tools” option (see image below).
On this subject, read the official specification.
Tools - Export under WordPress dashboard - screenshot at NoPassiveIncome blog

8. How to Integrate YouTube and Vimeo

The videos are a great content to be integrated on your posts.
Until some time ago, to insert a video into your content, it was necessary to copy and paste the embed code on YouTube (or Vimeo).
Now it is not like this anymore!
In fact, you simply need to copy the URL of your favorite video, paste it directly in the Visual Editor and WordPress will do all the rest of the work for you.

9. Insert Images in Widgets

Many WordPress users may be wondering how to insert images in the sidebar.
In fact, most of the themes do not have a specific widget for images.
The good news is that you do not have to install any additional plugin.
Simply proceed as follows:
  • load the image in the media library
  • then, click “edit” and identify the “URL of the file”
  • finally, surf on your WordPress dashboard a “Appearance”—> “Widgets” and insert a text widget in the sidebar. Within the text field, enter the following code
Now save the widget and you’ll see the picture in the live version of your site.

10. WordPres Allows You to Use Many Shortcuts!

A shortcut is a combination of keyboard keys that, when pressed together, perform a specific action.
For example, Ctrl+C is used to copy a selection of text, and Ctrl+V serves to paste it.
WordPress has many keyboard shortcuts, especially useful for formatting text.
You can find them all here.
Keyboard shortcuts at WordPress_org - screenshot of WordPress.org

Conclusion

Life is a never ending learning process, and so it’s WordPress!
In this guide we saw today 10 tricks you probably did not know.
Have you ever used these features or did you find them out today?
Do you think they are useful?
You just have to test them and be sure to let me know what you think in the comments!
And remember to share the post, if you enjoyed it!